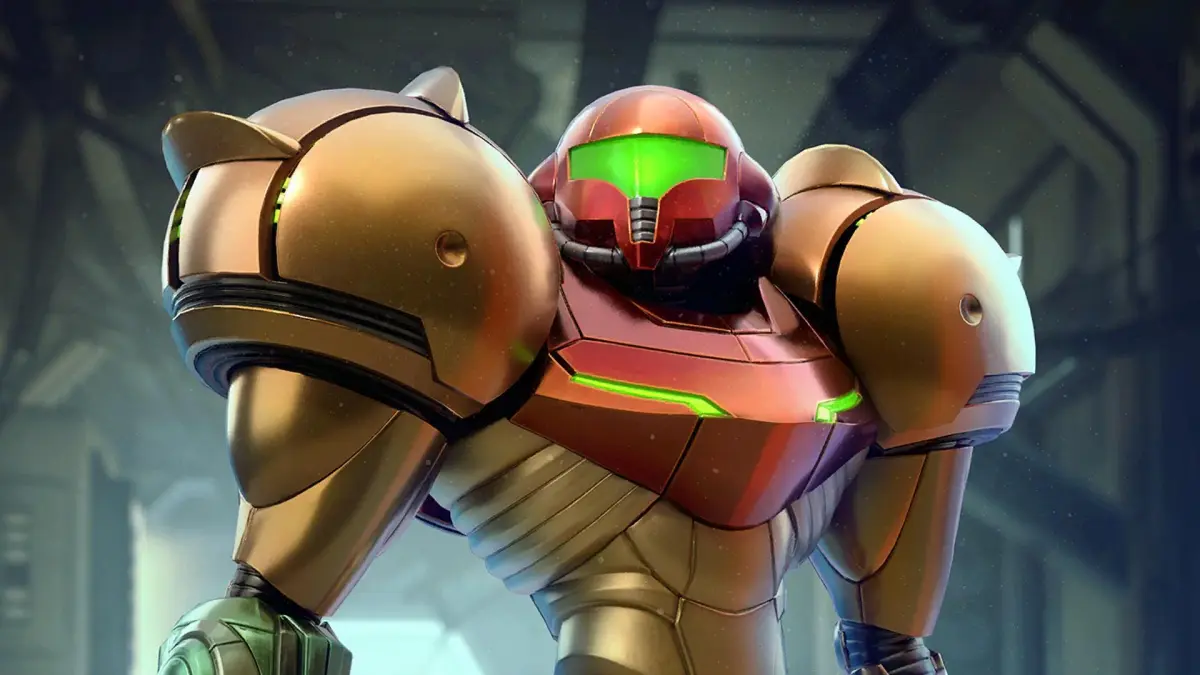
Embark on an epic solo journey through Tallon IV as Samus Aran in Metroid Prime Remastered. This action-adventure RPG casts you as a lone bounty hunter exploring a mysterious alien world, mastering Samus’s abilities, and uncovering its secrets. From your initial crash landing to the final artifact collection, you’ll face environmental puzzles, challenging boss fights, and a galaxy of hidden lore.
This guide is your comprehensive walkthrough to conquering Tallon IV. We’ll help you navigate the game’s intricate environments, find every hidden secret, and overcome the toughest challenges, ensuring you can experience the full story and achieve every objective.
FAQ
Metroid Prime Remastered FAQ: Learn how to save your game, perform a Double Bomb Jump, and what's needed for 100% completion.
- 1What is Metroid Prime Remastered? It is a 2023 remaster of the 2002 action first-person Metroid game developed by Retro Studios.
- 2How does it differ from the original and Trilogy versions? Unlike the _Trilogy_ version which was a graphics upscale with Wii controls, _Remastered_ has significantly updated models, textures, and effects for modern HD visuals. It also offers multiple control schemes, including a default "Dual Stick" option.
- 3Where does it fit in the Metroid timeline? _Metroid Prime_ takes place shortly after the original _Metroid_ and before _Metroid II_.
- 4How do you save the game? You must find Save Stations scattered across Tallon or return to your Gunship. There are no (checkpoints) or auto-saves, so save manually before quitting.
- 5How do you perform a Double Bomb Jump? This version includes the "Spring Ball" function from _Metroid Prime Trilogy_. In Morph Ball mode, hop, lay one Bomb in midair, then jump into the Bomb's explosion.
- 6Where should you go if lost? Ensure Hints are turned on. After wandering aimlessly for a few minutes, your suit will provide an alert indicating the next story objective.
- 7How do you get the different endings? The percentage of items collected determines the ending; time is not a factor. Scans in the Log Book do not count towards this percentage.
- 8What is needed for 100% completion? You need to collect the Wave, Ice, Plasma, and Phazon Beams; Varia, Gravity, and Phazon Suits; Morph Ball, Bombs, Spider Ball, Boost Ball, and Power Bombs (Morph Ball upgrades); Thermal and X-Ray Visors; Charge Beam; Grapple Beam; Space Jump Boots; 250 Missiles (Missile Launcher and 49 Expansions); 14 Energy Tanks; 8 Power Bombs (original four and 4 Expansions); and 4 Beam Combos (Super Missile, Wavebuster, Ice Spreader, Flamethrower).
- 9What if you are one item short of 100%? The Phazon Beam and Phazon Suit are counted as two separate items, even though they are acquired simultaneously.
- Save frequently at Save Stations or your Gunship, as there are no (checkpoints) or auto-saves.
- Ensure Hints are enabled if you find yourself lost.
- The Phazon Beam and Phazon Suit count as two distinct items for 100% completion.
Menus/Displays
Navigate Metroid Prime Remastered menus like Main, Pause, and Options. Understand your HUD, including radar, energy, and missile reserves.
- 1From the Title Screen, press A to access the Main Menu.
- 2Select 'Play' to start a game or manage save files.
- 3Choose 'Options' to adjust settings.
- 4Select 'Extras' to view the Concept Gallery, Character Gallery, and Soundtrack Gallery.
- 5During gameplay, press the pause button to access the Pause Menu.
- 6From the Pause Menu, select 'Inventory' to see collected items and weapons.
- 7Access the 'Log Book' to review analyzed entries.
- 8Select 'Options' from the Pause Menu for a more complete settings list than the Main Menu offers.
Main Visor Display Breakdown:
- Energy Reserve Meter: Located across the top of your heads-up display (HUD), showing your active Energy Tank and any reserve Energy Tanks.
- Mini-radar (your minimap with nearby blips and threats marked): In the top left corner, orange dots indicate enemies, and a cone shows your forward field of vision.
- Sector Map: A small map of your current section is in the top right corner.
- Threat Assessment: On the left side, this meter increases near dangerous areas like lava or acid, indicating potential damage.
- Missile Reserves: On the right side, this tracks your current Missile count.
- Visors: Shown in the lower left corner.
- Beam Weapons: Shown in the lower right corner.
- Targeting Reticle: In the center, this shows where your shots will go and may be adjustable depending on your control scheme.
Options Menu Details:
- Controls: Adjust your Control Scheme.
- Display:
- HUD Opacity: Controls how transparent your HUD elements are (100 is default, 0 is invisible except for the reticle).
- Helmet Visibility: Toggles the visibility of helmet elements around the screen's edge.
- HUD Lag: Simulates suit lag by delaying HUD elements as you turn; disable for immediate response.
- Hint System: On by default, provides alerts for your next story objective. Turn off for no hints.
- Extras Alert: On by default, notifies you of new Extras content. Turn off to avoid distractions.
- Color Assist: An accessibility feature (off by default) offering Red, Green, or Blue Assist for color differentiation.
- Color Assist Intensity: Adjusts the intensity of Color Assist if enabled.
- Sound:
- SFX Volume: Adjusts sound effect volume (100 is default, 0 is silent).
- Music Volume: Adjusts music volume (100 is default, 0 is silent).
- Narration: Enable 'Partial' for European-style narration (intro/finale voice-over) or 'Full' for Japanese-style narration (adds area announcements).
- Cinematic Subtitles: Displays subtitles for voiced narration if Narration is set to Partial or Full.
- Restore Defaults: Resets all options to their default settings.
- Quit Game: Returns you to the Main Menu. Ensure you have saved before quitting.
- Check the Options Menu from within the game for the full range of available settings, as the Main Menu version is reduced.
- Save your game frequently, especially before quitting.
- The Hint System can be turned off if you prefer to find objectives on your own.
Chapter 11: Plasma and Pickups (All Locations)
Master Metroid Prime Remastered! This guide details acquiring the Plasma Beam and finding all Plasma and Pickups items across Magmoor Caverns, Phendrana Drifts, and more.
Alright, we're finally getting the Plasma Beam! This section is all about grabbing that, plus a bunch of other important items scattered across Tallon IV. It's going to be a bit of a world tour, so get ready to backtrack a little.
Before we dive in, let's check our current haul:
- Missiles: 190
- Energy Tanks: 12
- Power Bombs: 5
- Chozo Artifacts: 5
Magmoor Caverns
First up, let's head back to Magmoor Caverns. Make your way to the Transport to Tallon Overworld West and take it. From there, you'll want to find the door you haven't explored yet.
You'll enter Twin Fires Tunnel. You'll need to use your Spider Ball to navigate across this fiery passage. Next up is Twin Fires, which involves more Grapple Beam action. Keep an eye out for stalactites you can knock down to create new paths. To get past the flame jets, you'll need to use your Ice Beam.
Continue through North Core Tunnel. Here, you'll need to knock down another stalactite to make your way across. Now, you'll arrive at Geothermal Core. This area starts off pretty tame. Hop across the initial platforms, then start climbing. You'll need to use your Grapple Beam to reach the lowest platform and operate a Spinner. Jump to the next platform, operate its Spinner, then jump back to the first platform and head to the one above it. From there, jump to the next platform, operate its Spinner, and then use your Spider Ball to head upwards. Reach the highest platform and bomb the switch to extend a pipe with a Spider Track. This is where things get tricky – it's the 'Death Spider Course'. It's not hard to figure out, but the timing and aiming can be tough. Remember, you can use a Bomb to jump higher while in Spider Ball mode, and just let go of the Spider Ball button to fall to a lower track. Keep practicing this part; you'll get to the top eventually!
Once you've conquered the course, you'll reach Plasma Processing. Congrats, you've earned the PLASMA BEAM!
Now, head out of Plasma Processing through the door opposite where you entered, into Geothermal Core again. Proceed through South Core Tunnel. Here, you'll encounter a new enemy, the Puddle Spore. Scan it if you want, but to get past, shoot it in its exposed mouth to flip it over, allowing you to cross.
Next, you'll be back in Magmoor Workstation. From here, we're heading to Phendrana Drifts for some serious item collecting. Take the Transport near this room up to Phendrana Drifts South.
Phendrana Drifts
Once you arrive in Phendrana Drifts South, make your way to Quarantine Cave. From a high ledge, you can use your Grapple Beam to cross to a tunnel.
In Quarantine Monitor, you'll find a MISSILE EXPANSION (38/49). Head back into Quarantine Cave, then through the main entrance towards Ice Ruins West.
In Ice Ruins West, look for one of the ruined structures on the northeast side. Its roof has ice on it. Use your newly acquired Plasma Beam to melt it and grab a POWER BOMB EXPANSION (2/4). You'll also notice how easily your Plasma Beam melts Sheegoths now!
Next, head to Phendrana Shorelines. Near the exit to Ice Ruins East, there's a small pillar with an ice wall on its backside. Melt it with the Plasma Beam to find another MISSILE EXPANSION (39/49).
Now, let's go to the Chozo Ice Temple. Head up to the fountain, melt the statue's hands, and roll up inside them. This will open a passage to the ARTIFACT OF SUN (6/12).
Backtrack to Ice Ruins East. On the ground level, near the upper door, look for an ice wall. Listen for the telltale hum of an item. Melt it with the Plasma Beam to discover a MISSILE EXPANSION (40/49).
Time for the Pirate Base! Head to Control Tower. Climb up one of the bunkers and melt the frozen window with your Plasma Beam. In the distance, you'll see the tower. Use a Missile on it to collapse it, creating a hole in the floor. Roll into this hole to get the ARTIFACT OF ELDER (7/12). To get out of this area, roll up to the collapsed tower itself; you can hop into its wreckage and roll your way to the top. From here, proceed through the Research Core and out to Frost Cave.
In Frost Cave, grapple across the Glider to the section with sloped platforms and two crates. Look up at the very top of the ceiling and shoot down the stalactite. It will crash through the pond below. Swim down to collect a MISSILE EXPANSION (41/49).
Continue to Phendrana's Edge. Jump and grapple up the platforms. After passing two floating platforms, activate your X-Ray Visor to reveal a hidden door. Use a Power Bomb to blow open the wall in front of it.
Inside Storage Cave, you'll find the ARTIFACT OF SPIRIT (8/12).
Back in Phendrana's Edge, keep climbing to the top of the room. Use the Glider creature to grapple up and roll into the next room.
In Security Cave, grab the POWER BOMB EXPANSION (3/4).
Head to Gravity Chamber. Melt the icicles in the ceiling with your Plasma Beam to reveal a Grapple Point. Swing on it, then turn towards the MISSILE EXPANSION (42/49).
Finally, in Transport Access, melt the ice along the path with your Plasma Beam to get an ENERGY TANK (13/14). That's everything here! You're conveniently located next to a Transport, so let's move on.
Magmoor Caverns - Part 2
Take the Transport back to Magmoor Caverns. Head to Warrior Shrine. Use a Power Bomb on the plug near the statue to get the final POWER BOMB EXPANSION (4/4).
Next, go to Shore Tunnel. Use a Power Bomb to break the glass in the tunnel and acquire the ICE SPREADER Beam Combo. Nice!
In Triclops Pit, near the crates where you first entered this room, use your X-Ray Visor to spot some hidden platforms. Follow them, and use a Missile on the nearby pillar to find a MISSILE EXPANSION (43/49).
Finally, in Lava Lake, use a Super Missile on the pillar in the middle of the first section of this room to snag the ARTIFACT OF NATURE (9/12).
Tallon Overworld
Now, let's hop over to the Tallon Overworld. Head to Root Cave. Climb to the very top of this room using your Grapple Beam and X-Ray Visor. Open the red door at the top.
Inside Arbor Chamber, you'll find a MISSILE EXPANSION (44/49).
Chozo Ruins
We're almost done! Head back to Chozo Ruins. Go to the Hall of the Elders. Hit the red light covering the Morph Ball Switch and bomb it to open a door to the Elder Chamber.
In the Elder Chamber, claim the ARTIFACT OF WORLD (10/12).
Phew! That's a lot of backtracking, but we've got the Plasma Beam and a ton of pickups. If you followed this guide, you should be right near the Transport to Tallon Overworld South, which will take you close to the Phazon Mines. Let's head there next!
Research
Master Metroid Prime Remastered's Research items! Learn about Energy, Missile, and Power Bomb pickups, plus essential Scan Stations, Save Points, and more.
Hey there! So, you're diving into Metroid Prime Remastered and want to get a handle on all the little bits and bobs that help you out? This section is all about those handy pieces of tech and architecture you'll encounter. Some you can scan anytime, others are a one-shot deal, and a few only get added to your Log Book once you've got the right gear. Let's break 'em down!
- Small Energy — These little purple balls drop from enemies and give you back 10 Energy. Handy for quick top-ups!
- Large Energy — A bit more substantial, these red balls restore 20 Energy. Also from enemy drops.
- Ultra Energy — The golden ticket! These rare finds replenish a whopping 100 Energy. Powerful enemies and supply crates are your best bet, and they seem to pop up more when you're really low.
- Small Missile Ammo — This orange pickup gives you three Missile rounds. Mostly from enemies.
- Med. Missile Ammo — This one's a bit more detailed, with four
Similar guides you might like




100% Human-Written. Community Verified. Learn how Ludo.guide verifies content