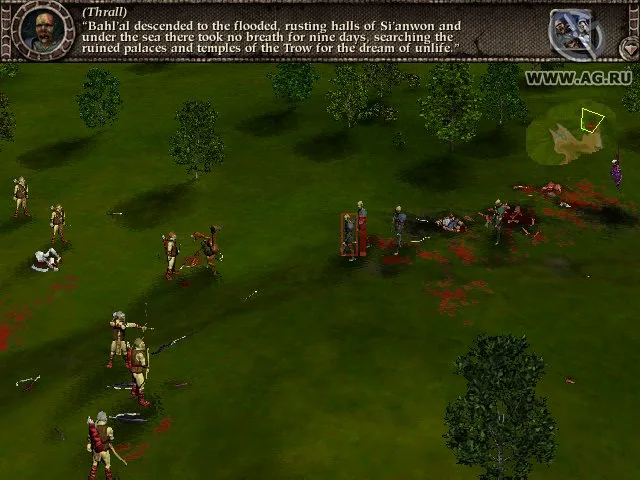
Welcome to Myth: The Fallen Lords, Bungie's 1997 real-time strategy classic. As a Legionnaire, you'll command units across treacherous terrain, utilizing advanced tactics and exploiting enemy weaknesses to push back the tide of the Fallen Lords. Master intricate battlefield control, manage hidden reinforcements, and understand the unique strengths of each faction to survive the brutal campaigns.
This guide dives deep into the PC version of Myth, offering insights on advanced unit control, terrain exploitation, and faction strengths. We'll help you conquer challenging missions and understand the nuances of commanding your forces, ensuring you're prepared for whatever the Fallen Lords throw your way.
Part 2
Learn about all the unit types in Myth: The Fallen Lords, including their strengths, weaknesses, and best strategies for deployment.
Archers
Archers move slower than warriors and much slower than bezerkers, and have no armor. They have unlimited arrows to shoot, but gravity affects their effectiveness. They require a minimum distance between them and the enemy. If the enemy gets too close and there is no where to run, you can have the archer punch the enemy by double clicking on them. It is best to use these units in packs in a long line (formation 2, oriented towards the enemy) from the highest vantage point possible like hills or cliffs. When the unit has little or no experience, they are lousy shots; but with experience, these units can really cause havoc to the enemy before they get to you. Try to keep them alive as most scenarios tend to have archers, and the experience of a unit carries over to the next scenario.
Dwarves
Dwarves are short humanoids who wield bottles of explosive liquids. They ignite the fuse of the bottles and throw them at their enemy for grenade-like results. Thrown into a pack of enemy units, the dwarf can decimate armies. Units within the vicinity of the blast will also receive damage. Because the grenade is ignited by a burning fuse, sometimes the action of throwing the bottle will blow the flame out, causing the bottle to drop harmlessly to the ground. Fallen bottles can be ignited by the explosion of other bottles. You can use the dwarf to pick up bottle "duds" (unexploded bottles) or even pick up slow-burning bottles and rethrow them. Weather conditions also affect the effectiveness of the grenades; wind, snow, rain, and rivers can blow out the fuses. Dwarven friendly fire is a significant concern, as dwarves may throw their grenades into the midst of your own soldiers. Use the attack-ground action when you need to influence the dwarf to throw smarter. Dwarves also have satchel charges (limited number, but they can pick up more) which can be set on the ground to effectively create a minefield. They must be detonated with a grenade. A good strategy is to create a group and line of charges for a domino effect of explosive destruction. Dwarves have humorous sayings when directed or when they make mistakes.
Journeymen
Journeymen are the healers of your party. They have a shovel to fight with, but they are slow. Since you need them for healing or picking up vital objects in missions, do not use them as a first line for combat. Keep them in the back of your party ready to heal the units that get injured.
Forest Giants
Forest Giants are tall, fast, strong, and can take a huge beating. In one swat, they can eliminate an enemy. Sometimes, their swat is so powerful that pieces of the unfortunate enemy can go flying into friendly units, causing some damage.
Thralls
Thralls are lumbering zombies that are slow but can cause a lot of unwelcome damage when they reach you with their battle axes. They can hide underwater out of sight. They tend to be bunched up in armies, which are perfect targets for the dwarf's grenade. Caught in the direct explosion of grenades, the thrall bursts into messy pieces in one shot.
Gholes
Gholes are fast nightmare creatures. They rush in and hack your men to death. Gholes are annoying and deadly pests who can pick up and throw just about any small object like an arm, a rock, a bone, a sword, and even wight pieces for use as a grenade. A direct hit with a grenade will usually blow these creatures apart.
Myrmidons
Myrmidons are the bezerker counterpart for the dark. They are fast and tough. One grenade hit is not enough to kill them. Try to weaken them as they approach and then send your warriors or bezerkers on them.
Soulless
Soulless are floating purple ghosts who have no limits to where they can go. Cliffs do not stop them, so remember that they can move into any territory. They often will retreat to the safety of a cliff side where no hand-to-hand combat unit can reach them. They wield spears which are thrown at the enemy. They aren't very strong, however, so when your soldiers do reach them, they can be hacked to pieces quickly. When you first meet a group of standing soulless, one arrow hit will usually make the hit unit retreat out of range. Use this fact to shoot each one in a group once to push them back. This usually spreads them apart enough so that you can snipe at them one at a time.
Wights
Wights are even slower than the thrall and are walking bombs. They lumber near your men and detonate themselves for an explosion more powerful than the dwarven grenade. Use your archers to blow them up from afar. An exploded wight leaves chunks of explosive body parts on the ground. Both the explosions of the chunks and the wight will spray a puss which will temporarily paralyze anyone who gets splashed.
Fetches
Fetches are evil priestesses who can cast lightning attacks to groups of men with obliterating results. Fortunately, they aren't heavily armored or very strong, so a few arrow hits can kill them before they are in range to use their lightning.
Shades
Shades are evil sorcerers who are slow but have a lot of stamina and a deadly attack. The shade will use a magic attack that will cause the target to explode in green smoke. Anyone in the vicinity of the explosion will also be affected.
- Keep archers on high ground for maximum effectiveness.
- Use dwarves to decimate large groups of enemies, but be mindful of friendly fire.
- Position journeymen behind your front lines to provide healing.
- Forest Giants are powerful but may cause splash damage to your own units.
- Thralls and Gholes are vulnerable to dwarven grenades.
- Weaken Myrmidons before engaging with melee units.
- Use archers to push back Soulless and pick them off individually.
- Destroy Wights from a distance to avoid their paralyzing explosion.
- Target Fetches with arrows before they can unleash lightning attacks.
- Be cautious of Shade's area-of-effect explosion attack.
Part 3
Learn about enemy types like Trows and Spiders, formations, and strategies for early missions in Myth: The Fallen Lords.
Enemies:
- Exploding Victim: These enemies explode upon death, causing chain reactions. Use archers or satchel charges to kill them, or avoid them. They do not cross water.
- Trow: A large, fast, strong, and deadly enemy. Attack them in groups and expect unit losses.
- Spider: Fast, not very strong animal creatures that attack anyone, including the dark. They attack in numbers and are brown.
- Queen Spider: Larger, faster, deadlier, and tougher versions of regular spiders. They are black.
Formations:
- Formation 1: Short Line: Useful for breaking units into teams or packing them together, but not ideal for combat.
- Formation 2: Long Line: Best for archers, spreading them out to rain arrows. Requires gesture click to orient effectively.
- Formation 3: Loose Line: A wider-spaced Short Line, useful for attacking widely spaced armies.
- Formation 4: Staggered Line: Rows of men are positioned between the rows in front. Useful for laying minefields with satchel charges.
- Formation 5: Box: Bunches men together for huddling or squeezing through tight areas. Avoid when under explosive attack.
- Formation 6: Rabble: Units are spaced approximately equally apart in a random fashion, good for keeping armies in a pack while moving.
- Formation 7: Shallow Encirclement: Forms units into a wide arc, ideal for pouncing on enemies, especially for killing Trows with warriors or berserkers.
- Formation 8: Deep Encirclement: A tighter angle version of the Shallow Encirclement, good for surrounding an already near enemy, but less effective for surrounding than the Shallow Encirclement.
- Formation 9: Vanguard: An inverted "V" formation for charging into enemy armies; not defensive.
- Formation 10: Circle: Creates a literal circle with men, good for guarding a unit but too slow for surrounding enemies.
Missions:
In Myth: The Fallen Lords, unit preservation is a high priority due to the absence of unit production. Strategies focus on preserving men and using the environment.
- Mission 1: Crow's Bridge
- Start with warriors on a bridge, move them and other units up the road to a hill.
- Gather all men in the city and move them to the hill.
- Position archers in a long line facing the bridge, with warriors split to protect their sides.
- Use archers against ghols, but maintain position.
- Have dwarves set up a minefield with satchel charges in front of the position.
- When thrall approach, detonate the minefield by targeting the nearest satchel charge.
- Archers should weaken the thrall, and warriors clean up stragglers.
- Stop dwarves and archers from attacking when warriors engage.
- Watch for flanking ghols and use archers to kill soulless.
- Bring warriors around to wipe out soulless if safe, but be mindful of ghols.
- The army will retreat over the bridge.
- Mission 2: A Traitor's Grave
- Follow a peasant leading to the traitorous mayor, watching for ghols. The peasant will wait or follow if you lag.
- Locate ghols near a dry river bed and to the NE, engaging a few before continuing.
- Find high ground across the dry river bed and set up archers in a line facing NE.
- When soulless and thrall appear, the peasant will retreat.
- Use dwarves to bomb the enemy, archers to kill soulless, and journeymen to defend your men.
- Follow the peasant N and NE towards a statue.
Part 4
Myth: The Fallen Lords Part 4 covers The Siege of Madrigal, Homecoming, and Flight from Covenant. Learn how to defeat wights and avoid myrmidons.
Mission 3: The Siege of Madrigal
- 1Start near a bridge over a river with archers and warriors.
- 2Take the bridge with archers, leaving some on the bank to provide covering fire.
- 3If the bridge is lost, use archers to snipe enemies, prioritizing soulless, and lure them into your warriors.
- 4Move your forces to the open area in the center of the village for your first encounter with wights (exploding zombies).
- 5Surround your warriors with archers to mitigate wight explosions and puss (which temporarily immobilizes).
- 6Listen for wights' moaning and watch the radar (your minimap with nearby blips and threats marked) map (a display showing nearby units) to detect them approaching from behind.
- 7Use archers to detonate wights from afar.
- 8Once all wights are cleared (no red dots on the radar), leave archers in the village and move warriors NE up the road.
- 9Engage ghols but continue following the road to find the main army of thralls and soulless east of the road.
- 10Upon identifying the army, send all warriors back to retrieve the archers.
- 11Lead all your men back to the bridge, using archers to kill any wights that appear.
- 12Clear out a small group of thrall and soulless near the bridge.
- 13Cross the bridge to complete the mission.
- Archers on the bridge are effective due to the high ground.
- Prioritize killing soulless with archers.
- Use warriors to engage enemies that cross the bridge onto your side.
- Archers are make-or-break for detonating wights from a safe distance.
- Keep an eye on the radar map for approaching wights.
Mission 4: Homecoming
- 1Your warriors appear in the world knot (a point of origin for units).
- 2Retreat warriors from the initial soulless attack from a high point in a coliseum.
- 3Use archers to shoot the soulless, while warriors handle any approaching ghols.
- 4Once archers move out, the journeyman will appear.
- 5Go around the east side of the coliseum, shooting soulless, and avoid the west side with the enemy army.
- 6Move southeast to encounter soulless and thralls; use archers on soulless, dwarves on thralls, and warriors to clean up.
- 7The codex is near the ruins (Cathedral).
- 8Another party will be attacked; finish off their attackers.
- 9Use the journeyman to heal everyone until he runs out of mandrake roots.
- 10He will go out of your control once you pick up the codex.
- 11Retrieve the green/yellow glowing codex.
- 12Follow the computer-controlled journeyman with the codex southeast.
- 13Keep ghols at bay with archers until the mission ends.
- Protect the journeyman at all costs, as he is the only one who can carry the codex.
- Use archers effectively against soulless and dwarves against thralls.
- The journeyman's healing ability is vital, but limited by mandrake roots.
Mission 5: Flight from Covenant
- 1Stop all units immediately upon starting.
- 2Send dwarves to destroy oncoming thrall, then retreat them.
- 3Set up archers in a line for long range and dwarves for initial attacks.
- 4Split warriors into two groups to cover (press the cover button to crouch behind walls or objects) the sides.
- 5Be wary of wights and use archers to attack them on sight.
- 6Defeat the three attacking armies.
- 7Do not take the road going east, as it leads to an ambush by myrmidons (faster, tougher enemies than thralls).
- 8Instead, go due north and make your way east through the swamps.
- 9Use archers on wights that appear and archers and warriors on thralls, as dwarf grenades are ineffective in mud.
- 10Constantly check the radar for wights (usually single red dots) in the swamp.
- 11This trek bypasses the large myrmidon army.
- 12After reaching land, defeat another group of thrall with dwarves and warriors.
- 13Follow the road (now leading ENE) until it forks.
- 14The escape tunnel is due east from the fork, at the base of a small hill with trees.
- 15Move everyone into the tunnel to complete the level.
- Myrmidons are dangerous; avoid them by going north through the swamps.
- Dwarf grenades are less effective in swamp terrain.
- Always be vigilant for wights on the radar.
- The escape tunnel is located east of the road fork.
Part 5
Walkthrough for Part 5 of Myth: The Fallen Lords, covering Missions 7, 8, and 9, including strategies for the Trow and freeing Alric.
- 1Move your forces down the hill (NE) to the icy river. Form archers in a line just before the unfrozen part of the river with dwarves to the left. Keep bezerkers nearby to defend against ghols attempting to flank and attack your archers and dwarves.
- 2On the other side of the river, an army of soulless and thralls awaits. Snipe the soulless with archers. Retreating slightly can draw them back to the river's edge, allowing for repeated sniping.
- 3As the army advances, maintain the archer line, but not too close to the river. Have dwarves ready to attack enemies as they exit the water, as the river will neutralize grenades.
- 4After defeating this army, cross the river and head NE, encountering more waves of soulless and thralls. Keep archers focused on soulless and dwarves on thralls, with bezerkers sweeping up.
- 5Continue towards the world knot, being mindful of ghols attempting to run in. Keep bezerkers close to the party and monitor the radar (a display showing nearby enemies).
- 6At the world knot, prepare for an army of soulless and thralls that will beam in. Engage them using your established tactics.
- 7Once the area is clear, set approximately 7 satchel charges at the base of a world knot pillar. Detonate them from a distance with a grenade.
- 8Alternate Route: Instead of crossing the river at the NE spot, follow it south to a crossing near a waterfall. This method is reportedly easier.
Mission 7: Bagrada
Your objective is to find the fate of the lost camp. You begin between two pillars, a defensible position against initial enemy waves.
- Keep sniping with archers and use fast bezerkers to prevent myrmidons from flanking. The pillars provide cover (a strategic position to block line of sight) from soulless spears.
- After dealing with the myrmidons, reposition bezerkers behind or between the pillars with the rest of your men.
- Several armies will attack. Flank soulless with bezerkers while dwarves and archers engage the main force. Use warriors to eliminate any enemies that get too close, and watch your dwarves carefully.
- Once all waves are defeated, proceed east. You may encounter myrmidons that keep their distance if your men remain grouped.
- As you approach them, they will retreat east to a point where they stop advancing, allowing you to snipe them with archers.
- Follow the tracks in the snow past stone markers. You will encounter four soulless on a hill, reachable only by archers. Use experienced archers to eliminate them and have the journeyman (a healing unit) heal any injured units.
- Move east and NE to another hill with two more soulless.
- Continue east. Reinforcements will appear from a southern passage, and another army will appear to the southwest. You can avoid fighting the southwest army by not moving your men near it.
- Group your forces and head NE to a wide, sloping ramp with a smoldering fire. Set satchel charges in a patch at the base of the ramp and position your men in a shallow circle further down.
- An army of thrall, soulless, and myrmidon will appear. Engage them, but prevent them from advancing up the ramp.
- As you ascend the ramp to a certain point, you will hear massive, fast footsteps. A large blue beast called the trow will descend the ramp.
- Attempt to detonate the satchel charges as the trow enters the area, then have all units attack it simultaneously.
Mission 8: Ambush at Devil's Overlook
This mission involves creating a minefield to defeat large soulless armies.
- You start with dwarves and bezerkers. Allow the two dwarves picking up satchels in the middle of the frozen lake to finish, but halt the dwarves laying down satchels.
- Move all units to the west end of the lake.
- Have your dwarves collect as many satchel charges as possible from the satchel pile. Use a staggered formation to lay charges across the lake, creating a minefield shaped roughly like an army. Repeat this three times so the charges detonate simultaneously.
- A scout will appear, followed by the first of two large soulless armies.
- Position your men to lead the soulless over the minefield. Have a few dwarves attack the edge of the minefield to trigger the charges, destroying the soulless.
- Use bezerkers to eliminate survivors while your dwarves set up the minefield again for the second soulless wave, which will already be visible on the radar.
- Lead the second army over the field and detonate the charges.
- Deal with any remaining stragglers. Use dwarves to engage them from the hill while flanking with bezerkers.
Mission 9: The Five Champions
Your goal is to free the captive sorcerer hero Alric. This mission requires preserving your men; failure occurs if any unit dies.
- You begin with an archer, a dwarf, a journeyman, and two bezerkers.
- Past the starting archway, use the archer to eliminate a soulless to the left.
- As you move into the area, more soulless will appear to the right. Eliminate them with the archer and bezerkers.
- Follow the path.
- Keep bezerkers close to your party to prevent ghols from flanking and killing less armored units.
- Use the radar to keep an eye on approaching enemies.
- When fighting the army emerging from the river, ensure dwarves are ready to attack as they exit the water, as the river neutralizes grenades.
- In Mission 7, use the pillars as cover from soulless spears.
- In Mission 8, create a minefield in the shape of an army for maximum effect against the soulless waves.
- In Mission 9, carefully manage unit health and stamina, as any loss results in mission failure.
Similar guides you might like


100% Human-Written. Community Verified. Learn how Ludo.guide verifies content