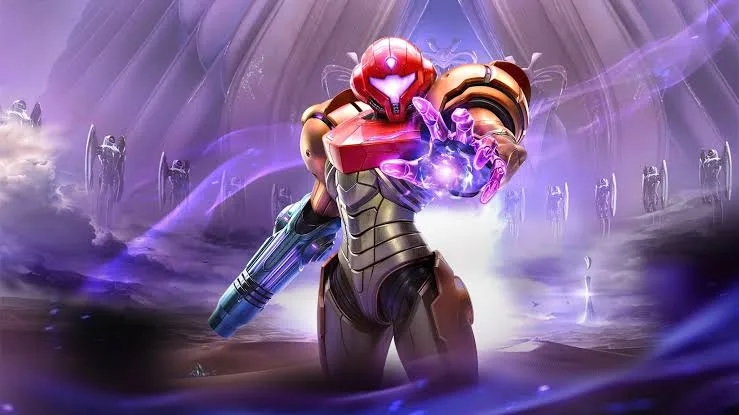
Welcome back, bounty hunter! Metroid Prime 4: Beyond drops you onto the alien world of Aetheria, where you'll need to master its threats and explore its environments to survive. As Samus Aran, you'll be unlocking vital upgrades like the Varia Suit and honing your combat skills against the daunting challenges that await you on Nintendo Switch.
This guide is here to help you navigate the intricacies of Aetheria. We'll cover everything from locating hidden collectibles and mastering challenging boss fights to understanding the game's progression and ensuring you don't miss any crucial items. Get ready to dive deep and uncover all the secrets Beyond has to offer.
Controls
Explore the control schemes for Metroid Prime 4: Beyond, including Dual Sticks, Pointer, and Fusion options. Learn button mappings for FPS, Morph Ball, and Vi-O-La modes.
Metroid Prime 4: Beyond offers a variety of control schemes, building upon previous titles. The primary options are Dual Sticks, which mimics modern console FPS controls, and Pointer, which uses gyro aiming similar to the Wii iterations. The Nintendo Switch 2 version introduces "Fusion" options for both, allowing the Right Joy-Con's mouse function for aiming. Extensive fine-tuning options are available in the Setting Menu under Menus/Displays.
All controls, with the exception of the Minus Button for the Pause Menu, are remappable. Input types are fixed (sticks for stick functions, buttons for button functions).
FPS Controls
| Input | Dual Stick | Pointer |
|---|---|---|
| Movement | Up/Down: Walk forwards/backwards Left/Right: Strafe left/right | Up/Down: Walk forwards/backwards Left/Right: Strafe left/right |
| Camera | Move Camera | N/A |
| Jump/Dodge | Jump Dodge while Lock-On | Jump Dodge while Lock-On |
| Morph Ball | Enter Morph Ball Mode | Enter Morph Ball Mode |
| Primary Fire | Shoot Beam Hold for Charge Beam Interact | Shoot Beam Hold for Charge Beam Interact |
| Visors | Toggle Visors | Toggle Visors |
| Lock-On/Scan | Lock-On Grapple Beam Scan with Scan Visor | Lock-On Grapple Beam Scan with Scan Visor |
| Secondary Fire | Shoot Beam Hold for Charge Beam | Reset Camera or Cursor |
| Weapon Select | Jump Dodge while Lock-On | Jump Dodge while Lock-On |
| Weapon Select | Fire Secondary Weapon Hold to Charge Secondary Weapon | Fire Secondary Weapon Hold to Charge Secondary Weapon |
| Weapon Select | Select Ice Shot | Select Ice Shot |
| Weapon Select | Select Missile Launcher | Select Missile Launcher |
| Weapon Select | Select Thunder Shot | Select Thunder Shot |
| Weapon Select | Select Fire Shot | Select Fire Shot |
| Vehicle | Mount Vi-O-La | Mount Vi-O-La |
| Menu | Pause Menu | Pause Menu |
| Gyro | Free Aiming during Lock-On | Aim and Turn Free Aiming during Lock-On |
Morph Ball Controls
| Input | Dual Stick | Pointer |
|---|---|---|
| Movement | Roll (Up is away from camera) | Roll (Up is away from camera) |
| Bomb | Bomb | Bomb |
| Boost Ball | Boost Ball (Hold to charge, then release) | Boost Ball (Hold to charge, then release) |
| Exit | Exit Morph Ball Mode | Exit Morph Ball Mode |
| Spring Ball | Spring Ball | Spring Ball |
| Spider Ball | Spider Ball (Hold) | Spider Ball (Hold) |
| Reset/Bomb | Bomb | Reset Camera or Cursor |
| Boost Ball | Boost Ball (Hold to charge, then release) | Boost Ball (Hold to charge, then release) |
| Power Bomb | Power Bomb | Power Bomb |
| Vehicle | Mount Vi-O-La | Mount Vi-O-La |
| Menu | Pause Menu | Pause Menu |
| Gyro | Spring Ball | Spring Ball |
Vi-O-La Controls
| Input | Dual Stick | Pointer |
|---|---|---|
| Steering | Left/Right - Steer Up/Down - Move slowly forward/backward | Left/Right - Steer Up/Down - Move slowly forward/backward |
| Camera | Up/Down: Look down/up Left/Right: Look left/right | N/A |
| Boost | Engage Boost | Engage Boost |
| N/A | N/A | N/A |
| Fire | Fire Projectile | Accelerate |
| Visors | Toggle Visors | Toggle Visors |
| Lock-On/Scan | Lock-On Scan with Scan Visor | Lock-On Scan with Scan Visor |
| Accelerate/Reset | Accelerate | Reset Camera or Cursor |
| Brake | Brake | Brake |
| Accelerate/Fire | Accelerate | Fire Projectile |
| Radio | Radio: Play/Stop | Radio: Play/Stop |
| Radio | Radio: Next Track | Radio: Next Track |
| Radio | Radio: Previous Track | Radio: Previous Track |
| Minimap | Toggle Minimap | Toggle Minimap |
| Dismount | Dismount Vi-O-La | Dismount Vi-O-La |
| Menu | Pause Menu | Pause Menu |
Notes on Missable Content
Metroid Prime 4: Beyond missable content guide. Learn about the point of no return and which scans are missable.
- 1There is a point of no return near the end of Metroid Prime 4: Beyond, which requires double confirmation to proceed past.
- 2Before reaching this point of no return, you should aim to have 100% of items collected and 98% of scans completed.
- 3The final two scans are obtained during the ending sequence.
- 4After passing the point of no return and completing the story, you will have the option to save a complete file. Do not use this save if you intend to finish collecting items and scans, as it prevents loading previous saves and the autosave is also past the point of no return.
Missable Scans:
- Space Pirate: Available from the Landing Pad until Research Lab Zeta. You must scan a living specimen.
- Galactic Federation Trooper: Available from the Landing Pad until Research Lab Zeta.
- Aberax: The boss of the opening area.
- Psychic Container: These must be scanned to open, but it's possible to miss scanning the containers themselves. The first is in Cliffside Gate in Fury Green, and the last is in the Storage Room in Flare Pool.
- The Boss of Fury Green: This boss has three scan locations: the main body, the arms, and the projectiles it throws. It is the only boss, besides the final boss, with multiple scan entries for the Logbook.
- Flight Drone MCU: First encountered in the Tower 2 Generator of Volt Forge. A second appears later when attempting to leave Volt Forge, but it becomes missable after that encounter.
- Snow Wolf: These appear only during an ambush in Ice Belt.
- Heavy Maintenance Tank: A mini-boss fought once in the Entry Bay of Flare Pool.
- Hover Shuttle Transport: This shuttle attacks Samus in the Control Room Bridge as she and her party are leaving, and it is the only one in the game.
- Swim Snatcher: A unique enemy found in Flare Pool in Volcano Heart, appearing in a room after returning later, not during the sector boss fight.
- Behemoth: A unique enemy located in Flare Pool near a Mech Part.
- The Boss of Great Mines: Unlike other sector bosses which can be scanned again in the Chamber of the Guardians in Fury Green, this boss does not offer a second chance for scanning.
- The Final Boss: The final boss has a second form in the third phase of the fight, which can also be scanned.
- As a general rule, missable scans include those found in the opening chapter and unique enemies.
- Ensure you have 100% items and 98% scans before proceeding past the point of no return.
FAQ
Frequently Asked Questions about Metroid Prime 4: Beyond, covering gameplay mechanics, story placement, save systems, advanced techniques, and 100% completion requirements.
Q: Just what is Metroid Prime 4: Beyond?
A: This is a new first-person Metroid game, released in December 2025, from Nintendo by Retro Studios. It is the fourth numbered game in the Metroid Prime subseries and the seventh game including spinoffs.
Q: How does this game differ from other games in the Metroid Prime series?
A: This game continues on many things set up in 2023's Metroid Prime Remastered, which is to say it uses more modern controls than older games in the series, and while it plays very much like other Prime games, it is very much a modern edition.
Q: Where does this game take place in the Metroid timeline?
A: Metroid Prime 4: Beyond occurs three years after the events of Metroid Prime: Federation Force. In an interview with producer Kensuke Tanabe, he confirmed that it takes place between Super Metroid and Metroid Fusion.
Q: How do I save the game?
A: While this game has an autosave, it doesn't trigger very often. Specifically, the game will autosave once you change sectors, and you will get "checkpoint" saves at major boss fights in case you lose. All that said, there are still Save Stations scattered around Viewros to manually save, which should definitely be worked with.
Q: How do I do a Double Bomb Jump?
A: While the Spring Ball function can be used to get ahead of needing to do a Double Bomb Jump in most cases, there are actually a couple of instances where you need to do it. The gist of it is that you lay a Bomb, and right before that Bomb explodes, set a second one, then set a third just before you reach the very top of the jump. You should fall and land on the second Bomb, then ride up to the third. An easier way, I feel, is to count out to four at a medium pace: "1, 2, 3, 4". Lay Bombs on counts 1, 3, and 4. Just keep practicing and you should get it down.
Q: I'm lost. Where should I go next?
A: Go to your Map and press X to get on the radio. For the most part, MacKenzie will be the one to reach out first and give you ideas of where to go.
Q: How do I get the different endings?
A: Percentage of items collected determines each ending in this game. Time is not factored in to which ending you get. Scans in the Log Book don't count towards that percentage, so you'll still get that good ending even if you missed a scan.
Q: What do I need to have for 100%?
A: In addition to all the required regular progression items, you'll also need:
- Enough Green Energy to fill the indicator once and get the Memory Fruit. You do NOT need to fill it the second time.
- All the rewards from the six Sol Valley shrines.
- 250 Missiles (The Missile Launcher and 49 Expansions)
- 14 Energy Tanks (They will complete the line across the bar)
- 8 Power Bombs (The original three and 5 Expansions)
- 530 Elemental Shot Ammo (combined from regular and Large Shot Expansions)
Q: How do I turn on the Vi-O-La Radio?
A: You need to unlock it first, which only happens once you complete a file with 100% Scans. Alternatively, you can scan a Metroid Prime 4 Samus amiibo to unlock it early.
Q: What's the "???" below "Scan amiibo" in the amiibo section?
A: "VI-O-LA SKIN", which is only unlocked if you have a Samus and Vi-O-La amiibo scanned in.
Menus/Displays
Navigate Metroid Prime 4: Beyond's Main Menu, HUD, and Pause Menu. Learn about amiibo unlocks and settings.
Main Menu Options:
- Play: Select a game file to begin, or copy and erase existing files.
- Settings: Access the Settings Menu.
- Extras: Explore the Concept Gallery (original and Remaster art), Character Gallery (Remaster models), and Soundtrack Gallery.
Main Visor Display (HUD) Explained:
- Energy Reserve Meter: Located across the top, showing active Energy Tank energy and any reserve Energy Tanks.
- Mini-Radar (your minimap with nearby blips and threats marked): Top left corner, displaying enemies (red dots), friendly units (green markers), and Samus' forward field of vision.
- Threat Assessment: Also in the top left, this meter increases near hazardous areas like lava or acid, causing an exclamation point to flash.
- Sector Map: Top right corner shows a small, current section of the map.
- Friendly Health Meters: Displayed on the left side for allies in the area.
- Subweapons: Shown in the lower left corner.
- Ammunition: Displayed in the lower right corner.
- Targeting Reticle: In the center, indicating where shots will travel; adjustable based on control scheme.
Pause Menu Options:
- Map: View the current room, surrounding sector, and world map (Sol Valley, once available). Use sticks and triggers to navigate the 3D map, directional inputs to switch floors, and the Plus Button to toggle between sector and world maps. Hover over entrances and press A to access a sector's map. Place markers with the Y Button, which will color the entire room green. The X Button provides objective updates. Map Stations fill in unexplored areas as gray. Unopened doors are orange. Various markers indicate locks and items found by Scout Bots.
- Inventory: Review collected items and weapons, along with total ammunition and energy.
- Mission: Track progress on active missions, which are added as they appear.
- Logbook: Access entries gathered by analyzing in-game elements.
- Settings: Access the Settings Menu.
- amiibo: Scan Metroid series amiibo.
- Non-Metroid Prime 4: Beyond Metroid amiibo play a random Metroid jingle.
- The Metroid Prime 4: Beyond Samus amiibo secures the Vi-O-La Radio for listening to tunes. Once per day, it grants an Energy Shield, filling Samus' energy and adding 99 temporary energy (yellow shield) that replenishes the next day.
- The Samus & Vi-O-La amiibo earns the Vi-O-La Skin function and Vi-O-La Odometer. New skins unlock every 50,000 meters traveled on the Vi-O-La, with the last skin at 350,000 meters. These skins are persistent across game files. Once per day, it enables
Similar guides you might like



100% Human-Written. Community Verified. Learn how Ludo.guide verifies content