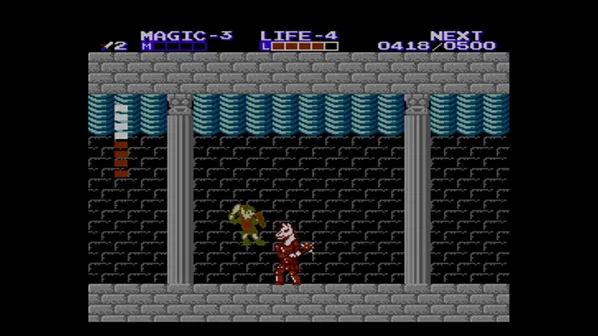
Welcome to Zelda II: The Adventure of Link, a unique entry in the legendary series that trades top-down exploration for side-scrolling action and RPG elements. As Link, you'll venture across Hyrule to find the Triforce of Courage and awaken Princess Zelda from her eternal slumber. This means mastering a new combat system featuring blocking and magic, exploring towns, and delving into dangerous dungeons filled with enemies and challenging platforming.
This guide is your key to conquering Hyrule's toughest challenges. We'll walk you through essential spells and techniques, help you uncover every hidden item scattered throughout the land, and provide strategies for defeating formidable bosses like the Iron Knuckle. Get ready to equip yourself with the knowledge needed to overcome every obstacle and reignite the Triforce.
Through the Swamps
Guide to navigating the Tantari Desert, Ruto Town, and the treacherous Moruge Swamp in Zelda II: The Adventure of Link. Find Magic Containers, Trophies, and learn the Jump spell.
- 1Tantari Desert: Depart Parapa Palace southwest, re-enter the cave passage. Fight Lowders (3 EXP each) and exit. Head southwest of North Castle to a cave. Fight Lowders and Red Octoroks (10 EXP each). Obtain Magic Container #1 at the end. Exit and head north of North Castle to Tantari Desert. Enter the cave near the sea. Defeat Aches, then two Red Octoroks while avoiding lava pits. Defeat the Red Goriya (20 EXP) and obtain the Trophy. Exit and head south to the road, then west into mountains to find Ruto Town.
- 2Ruto Town: Heal at the first house. Restore magic at the second house. The man in the next building says "I am Error" initially. An old woman mentions "Hammer... Spectacle Rock... Death Mtn." The maiden in the next building invites you in if you have the Trophy. Go to the basement to learn the Jump spell from an old man. This spell allows Link to jump twice his height on the current screen. Townsfolk offer hints: use Keys in palaces, don't go south without a Candle, and a Magic Container is south of the castle (referring to the one found earlier).
- 3Passage to the Swamp: Exit Ruto Town and head south to a cave. This cave has three sections. First section: Red Octoroks. Cast Shield. Second section: Red Goriya, then Lowders, then another Red Goriya. Cast Shield again. Third section: Aches, and a red Ache that transforms into an Acheman (10 EXP). Conserve magic here. At the end, cast Jump to scale a tall wall and exit.
- 4Moruge Swamp: You emerge near Moruge Swamp. Go east to a lone tree bordering the swamp to find a hidden Fairy.
- Crouch to block Octorok projectiles and attack when they jump.
- Be cautious of lava pits when fighting Red Octoroks in caves; time your jumps carefully.
- The Jump spell is essential for traversing certain areas, including the exit of the cave passage to Moruge Swamp.
- Conserve magic in the third section of the cave passage to the swamp, as the Acheman can be challenging.
- Heal and restore magic in towns before undertaking difficult cave sections.
- Magic Container #1 (increases magic meter)
- Trophy (required for progression in Ruto Town)
- Jump Spell (enhances mobility)
- Hidden Fairy (restores health)
Setting Out
Learn how to begin your journey in Zelda II: The Adventure of Link. This guide covers departing North Castle, navigating the overworld, and reaching Rauru Town to learn the Shield spell.
- 1From North Castle, exit right or left.
- 2On the overworld map, stay on the yellow road to avoid enemies. If you leave the road, run towards Fairy icons if low on health. Enemy icons lead to combat encounters.
- 3Defeating enemies grants EXP (Experience Points) to level up Life, Magic, and Attack. Fight enemies near towns for easier healing.
- 4Follow the road northeast from North Castle, then take the northwest fork towards Rauru Town.
- 5Enter Rauru Town. Talk to townspeople for hints. A woman in red outside a small white house will heal you fully inside her home.
- 6In the second part of town, a maiden in purple will lead you to her father, a wise old man in the basement.
- 7Speak with the old man to learn the Shield magic spell.
- 8To use magic: Press Start to open the menu, highlight the spell, press Start again to unpause, then press Select to activate the spell. This consumes magic.
- 9Hints from townspeople: An old woman mentions returning the crystal to Parapa Palace. A man in a house says, "If all else fails use Fire." A young man notes, "Only the Hammer can destroy a roadblock." A young woman advises, "Find the Heart in southern Parapa." A child in the last house says, "Get Candle in Parapa Palace. Go west."
- 10Leave Rauru Town and return to the overworld map.
- 11Follow the road northwest from Rauru Town to a small forest.
- 12Enter the forest to find blue bats called Aches. Dodge their attacks and hit them with your sword.
- 13Defeat Aches for 3 EXP each. Collect the Treasure Bag (50 EXP) in the middle by crouching and hitting it with your sword.
- 14Use the Treasure Bag EXP to level up Life to 2.
- Enemies hit hard; healing is limited. Fight near towns.
- Magic consumes the magic meter; use spells strategically.
- The goal of the game is to return six crystals to their palaces.
- The Candle is needed for Parapa Palace. The Hammer is needed for roadblocks. The first Heart Container is in southern Parapa.
Learn the Shield spell and gain your first level up in Life.
Parapa Palace
Walkthrough for Zelda II: The Adventure of Link's Parapa Palace, detailing enemy strategies, item locations, and required levels.
- Attack: Level 1 (at least)
- Magic: Level 2 (at least)
- Life: Level 2 (at least)
- Magic Meter: 4 blocks
- Life Meter: 5 blocks
- Magic Spell: Shield
- 1Start at the outdoor entrance and go right to find an elevator. Use the D-pad (Up/Down) to control it and descend into the palace.
- 2Go left. Defeat Wosus (dog-like enemies that drain life and EXP on contact).
- 3In the next room, avoid Bots on the ledge above. Defeat the Red Stalfos by crouching, waiting for it to approach, and striking it with your sword. It yields 30 EXP. Continue west, defeat another Wosu, and grab Key #1.
- 4Backtrack right to the first elevator and continue right. Unlock the door with Key #1.
- 5In this room, defeat Wosus. Avoid or fight Bubbles (flying flaming skulls that drain life and magic; they take many hits and respawn (be brought back to life at a checkpoint after death)). It is not recommended to fight Bubbles here due to low Attack level and infinitely spawning Wosus.
- 6Continue right. Defeat a Red Stalfos, ignore the elevator, and defeat another Red Stalfos.
- 7Fight past a Bot and Bubble, then defeat a third Red Stalfos.
- 8Take the elevator next to the Fairy. This Fairy can be used for healing but will only respawn if you leave and reenter the palace.
- 9Go up a level. Go right and defeat Wosus to pick up Key #2.
- 10In the next room, cast Shield (select on pause menu, unpause, press Select). Link's clothes turn red, and you take half damage. This spell lasts as long as you are in the current room/screen.
- 11Defeat the Bot and Wosus. At the end of the room, defeat the Guma (bull-like enemy that throws chain hammers) by getting inside its attack arc and striking it. A Guma yields 50 EXP.
- 12Take Key #3 guarded by the Guma. Strike the statue behind it to get a Red Magic Jar, which restores all of Link's magic. These statues can only drop a Magic Jar once per palace visit unless you leave and reenter.
- 13Backtrack left to the elevator and go down.
- 14On the floor with the Fairy, go left to the next elevator and take it down.
- 15Ignore the statue to your right. Go left past four Bubbles, including a fast one.
- 16In the next room, defeat two Bots. Carefully cross the collapsing bridge, walking continuously to avoid falling into the lava below. You can grab the Treasure Bag (50 EXP) on the way if you are daring.
- 17Defeat two more Bots at the end of the bridge and advance to the next room.
- 18In this room, cast Shield. Defeat another Guma.
- Wosus drain EXP if they hit you, so avoid contact if possible.
- Bubbles respawn and take many hits; focus on avoiding them in the early parts of the palace.
- The Shield spell is clutch for reducing damage from enemies like Gummas.
- Red Magic Jars restore all magic, making them very valuable.
- Fairies can be a lifesaver but are a limited resource per palace visit unless you reset the palace by leaving and returning.
- Collapsing bridges require constant forward movement to cross safely.
- Key #1
- Key #2
- Key #3
- Fairy
- Red Magic Jar
- Treasure Bag (50 EXP)
Navigating Death Mountain
Navigate the treacherous Death Mountain in Zelda II: The Adventure of Link. This guide details the path through caves, enemy encounters, and the quest for the Hammer and Magic Container.
- 1After leaving Midoro Palace, head through the swamp and return to the road leading to Saria Town. Instead of returning to Saria, find the woods north of the bridge northeast of Saria Town. Beware of hidden traps and leaping Megmats.
- 2Locate Bagu's house in the center of these woods and enter. Speak to Bagu; he will give you a note for the River Man.
- 3Return to Saria Town, preferably via the eastern bridge. Go to the hut by the impassable river on the far left.
- 4Speak to the River Man. With Bagu's note, he will erect a bridge for you to cross.
- 5Exit Saria Town to the left, and you will find the tunnel leading to Death Mountain.
- 6Enter Death Mountain. This area is a network of caves. Always take the eastern path when presented with multiple options. Ignore caves without numbers, as they are dead ends.
- 7Cave #1: Defeat Bots and two Red Moblins. Exit to the east.
- 8Cave #2: Ascend steps to defeat three Red Octoroks. Descend the other side, facing a Blue Goriya. Descend another set of steps, carefully avoiding three Red Octoroks. Exit to the east.
- 9Cave #3: Defeat Bots and Aches. Ignore the elevator and continue right to face an Orange Daira (fight like a Stalfos, timing attacks between swings). Exit to the right.
- 10After exiting Cave #3, you'll cross a small wood where you might encounter Deelers and Moblins. Proceed into the east cave entrance.
- 11Cave #4: Cross a bridge over lava while avoiding Bago-Bagos and their projectiles. Crouch to dodge. Exit to the east.
- 12Cave #5: Cast Jump upon entering. Navigate high ledges. Defeat Bots and Red Dairas (which throw axes continuously).
- Your levels should be at least 4-4-5 before attempting Death Mountain. If not, level up in areas like Parapa or Midoro Palaces.
- Death Mountain is a test of endurance with few healing opportunities.
- When facing enemies, use sword beams when possible. For enemies like the Orange Daira, use a run-and-crouch stab strategy.
- When descending steps with Red Octoroks in Cave #2, wait for them to shoot a stone, then move down next to them, holding Left to avoid collision.
- Hammer (obtained at Spectacle Rock)
- Magic Container (obtained at Spectacle Rock)
Similar guides you might like





100% Human-Written. Community Verified. Learn how Ludo.guide verifies content